
Outsourced Frontend Team Onboarding: What We Send Every New Client in the First Week and Why
Huzefa Motiwala May 22, 2026
When onboarding an outsourced frontend team, the first week is critical to set the tone for success. A clear, structured process ensures faster productivity, reduces risks, and builds trust. Here’s what we focus on during Week 1:
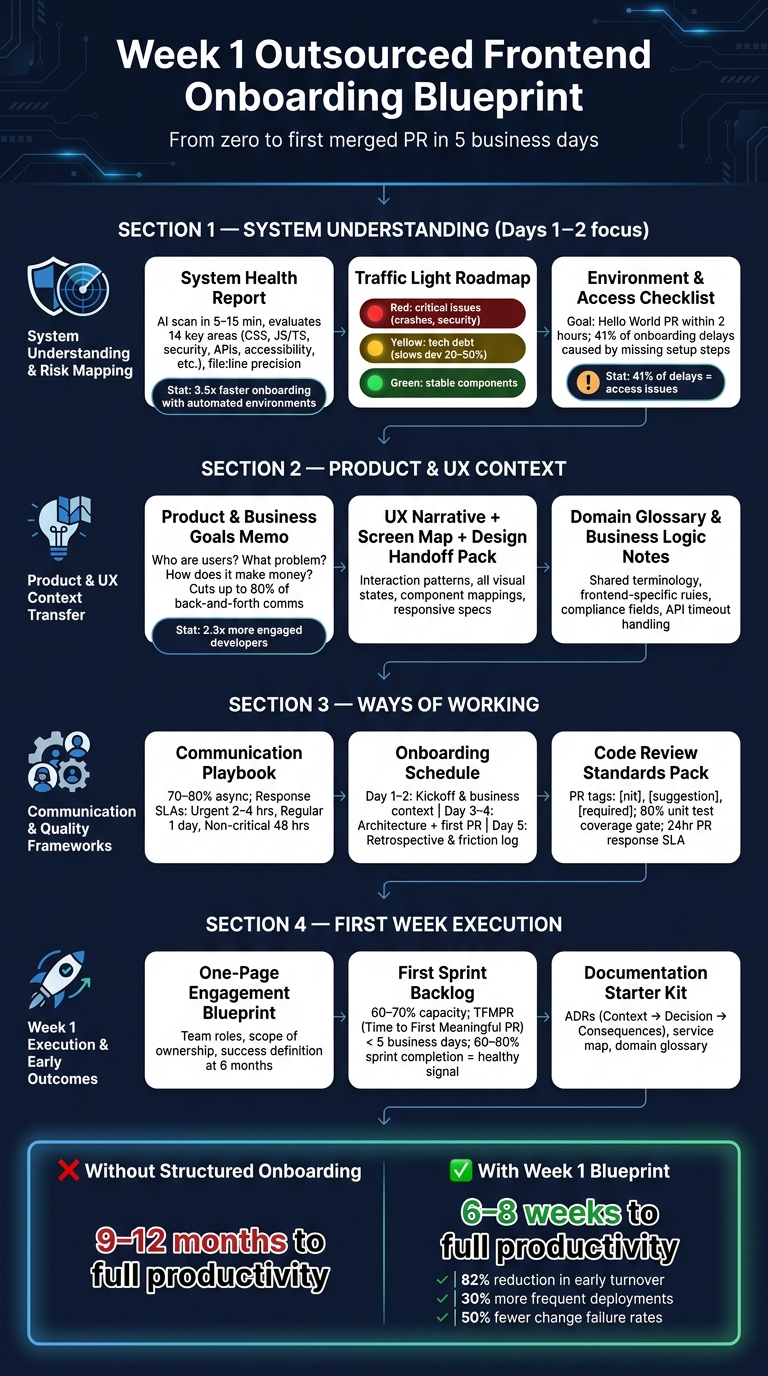
- System Understanding: We provide a System Health Report and Traffic Light Roadmap to identify risks and prioritize tasks. This ensures the team knows the system’s strengths and weaknesses from the start.
- Technical Setup: An MVP Frontend Architecture Brief and an Environment and Access Readiness Checklist ensure the team is ready to code within hours, not days.
- Product Context: A Product and Business Goals Memo, along with UX Narratives and Design Handoff Packs, gives developers a deep understanding of the product’s purpose and user needs.
- Communication Frameworks: We establish clear communication norms and decision-making processes, including response times and ownership roles, to avoid delays.
- First Deliverables: By the end of Week 1, the team submits a merged pull request, validating their setup and readiness to work.
Key takeaway: A structured onboarding process reduces delays, minimizes tech debt, and ensures the team delivers production-ready code faster. If done right, teams hit full productivity in 6–8 weeks instead of months.
Outsourced Frontend Team Onboarding: Week 1 Process & Key Deliverables
Onboarding 2.0: Designing better developer interactions from day one
sbb-itb-51b9a02
System Understanding and Risk Mapping
When working with outsourced teams, it’s crucial to equip them with a clear understanding of the system they’ll be working on before any coding begins. Skipping this step can lead to tech debt piling up right from the first sprint. To avoid this, there are three key deliverables that provide the team with a solid, well-informed starting point. These deliverables also ensure critical risks are addressed early. Let’s break each one down and see how they help minimize technical risks.
System Health Report and Traffic Light Roadmap
The first step is running an AI-Agent Assessment, a proprietary scan of your codebase that takes just 5–15 minutes. Unlike manual reviews, this scan identifies risks that might otherwise go unnoticed [10]. The result is a System Health Report, which evaluates 14 key areas, including CSS/styling architecture, JS/TS quality, accessibility, security, API resilience, and more [9]. Each issue comes with a precise file:line reference, so there’s no guesswork involved [11].
This report feeds into the Traffic Light Roadmap, which categorizes findings into three levels:
- Red: Critical issues (e.g., crashes, security vulnerabilities, or payment system failures) that need immediate attention.
- Yellow: Manageable technical debt that can slow development by 20–50% but can be addressed over time.
- Green: Stable components that are functioning well and should remain untouched [12].
The roadmap isn’t just for engineering – it’s also a prioritization tool for the business. A specialized team, including experts like Taher (architecture), Huzefa (frontend/UX), Aliasgar (backend), and Rohan (infrastructure), reviews the findings and adds business context before presenting them to you.
"Technical debt isn’t ‘bad code.’ It’s the delta between the current state of your system and the state it needs to be in to support your current and near-future business goals." – AlterSquare [12]
Considering that engineering teams spend about 42% of their time managing technical debt [12], the Traffic Light Roadmap is designed to make this debt visible and actionable from the outset, preventing it from silently growing under the pressure of new features.
MVP Frontend Architecture Brief
After assessing system risks, the next step is to clarify the frontend architecture. For this, the team receives an MVP Frontend Architecture Brief – a concise document outlining the current stack, rendering model, component structure, and key integration points like APIs, authentication, and third-party services. This document provides a clear overview of the system’s structure.
The brief simplifies complex systems by grouping individual classes into capabilities and endpoints into use cases, keeping the diagram manageable with just 5–12 components [8]. This approach ensures developers have a shared understanding, enabling them to make informed decisions independently.
"If it cannot be drawn, it is not architecture." – Ranjan Kumar [8]
Additionally, the brief highlights subtle but critical structural issues, such as undocumented asynchronous boundaries and logic leakage in handlers, which might not be obvious during a surface-level code review but can cause significant challenges for new developers [8].
Environment and Access Readiness Checklist
The final deliverable, and often the most overlooked, is the Environment and Access Readiness Checklist. This checklist is crucial because 41% of onboarding delays in global IT outsourcing stem from missing or incomplete setup steps [7]. The goal is to have all tools and systems configured before the team’s start date, not after.
The checklist covers essentials like:
- Source control (e.g., GitHub/GitLab access, branch protection rules)
- Cloud and infrastructure (e.g., staging access, VPN, database credentials)
- CI/CD pipeline permissions
- Communication tools (e.g., Slack, Jira/Linear)
- Monitoring dashboards (e.g., Sentry, Datadog)
A practical benchmark is ensuring that a new developer can complete a "Hello World" pull request within two hours of starting. This PR should validate the entire commit-review-merge-deploy pipeline [1][7]. By Day 3 or 4, the team should have this process fully functional [7].
"Teams with fully automated development environments onboard new contributors 3.5x faster than those relying on setup wikis." – Matt Li, Co-Founder & CEO, Branch8 [1]
If a developer can’t set up their local environment and start working within two hours using only the provided documentation, the checklist isn’t complete. That two-hour limit isn’t just a guideline – it’s a firm standard [13].
Product and UX Context Transfer
Once the system’s health is squared away, the next big hurdle is ensuring the frontend team understands why the product exists – not just what it does. Without this context, decisions can quickly go off track. A developer might know the codebase inside and out, but if they don’t grasp the user’s needs or the revenue model, they’re likely to make misguided choices when faced with unclear implementation scenarios. With system reliability in place, it’s critical to shift focus to delivering the right business and UX context.
Product Context and Business Goals Memo
This one-pager answers three key questions: Who are the users? What problem does the product solve? And how does it make money? It outlines target personas, the jobs the product addresses, success metrics (like "reduce checkout abandonment by 30%"), and a short product roadmap for the next two quarters. Just as importantly, it includes an out-of-scope list – a clear guide to what the product isn’t trying to do. This prevents developers from spending time on unnecessary features [14][15].
This memo turns broad business goals into actionable insights for developers, creating a bridge between system readiness and product execution. According to Harvard Business Review, employees who understand the purpose behind their work are 2.3 times more likely to stay engaged after the first quarter [7]. For outsourced teams, this context can mean the difference between simply executing tasks and making smart, independent decisions.
"Start with why, not what. Your offshore developer needs to understand the business context to make good micro-decisions throughout implementation." – Rajat Jain, CEO, Offshore1st [14]
A well-crafted memo can cut down up to 80% of back-and-forth communication between onshore and offshore teams caused by vague requirements [14]. Spending 30–60 minutes upfront writing it can save 10–20 hours of clarifications over the next two weeks [14].
UX Narrative, Screen Map, and Design Handoff Pack
Figma files alone won’t cut it. Developers need more than visuals – they need to understand how the product behaves. That’s where the UX Narrative comes in. It describes interaction patterns, transition logic, and edge cases. The Screen Map lays out screens in a linear flow with arrows to show the user’s journey – where they’re coming from and what triggers each next step [16].
The Design Handoff Pack fills in the technical details that visuals alone don’t cover:
- All visual states (loading, error, empty, success)
- Component mappings tied to the design system
- Spacing and typography tokens
- Responsive designs for mobile, tablet, and desktop
When behavior isn’t defined, developers end up making UX decisions on their own – decisions that might not align with the product’s vision [16][4]. A complete handoff eliminates this guesswork entirely.
"A good design-to-development handoff doesn’t explain everything; it removes the need to ask. If developers have to ask what happens next, the handoff isn’t done yet." – Brajkishor Baheti, CEO, Procedure Technologies [16]
| Handoff Artifact | Primary Purpose | Key Elements Included |
|---|---|---|
| UX Narrative | Explains behavioral intent and "why" | User stories, interaction patterns, business logic, edge cases [16][14] |
| Screen Map | Visualizes the user journey | Linear screen flow, arrow connectors, branching logic [16] |
| Design Handoff Pack | Provides technical implementation specs | Visual states, component mapping, spacing/typography tokens, responsive variants [4] |
These tools ensure developers have all the details they need to implement the product seamlessly.
Domain Glossary and Business Logic Notes
Every product comes with its own set of terms. Words like "Qualified Lead", "Escrow Period", or "Active Subscription" can mean something specific – or nothing at all – depending on the context. Without a shared glossary, developers might rely on generic assumptions, leading to bugs or confusing UI copy [17]. A glossary ensures everyone is on the same page and complements earlier technical briefs by standardizing language and eliminating misunderstandings.
Business Logic Notes take it further by documenting frontend-specific rules. These include details like how pricing tiers affect user visibility, which fields must meet compliance standards, what happens during API timeouts, and how the UI handles invalid inputs. Clear requirements can more than double project success rates [17], while incomplete specs are a major cause of budget overruns – sometimes by 50–200% – in outsourced projects [17]. Defining these rules in the first week is far more cost-effective than discovering gaps during QA.
"If two developers would interpret something differently, it needs more detail." – Pangea.ai [17]
Ways of Working and Communication Frameworks
Getting technical alignment through risk mapping and UX context is just the first step. To keep everything running smoothly, a clear operational framework must be in place from the very beginning. Without it, even a well-documented project can hit roadblocks – decisions are delayed, messages go unanswered, and responsibilities become unclear. That’s why setting up this structure happens right in week one.
Communication and Decision-Making Playbook
This playbook lays out how the team communicates and makes decisions, dividing communication into two key categories: synchronous (used for complex problem-solving and ceremonies) and asynchronous (for routine updates). Around 70–80% of communication happens asynchronously, which helps protect deep focus time and keeps meetings sharp and purposeful [6].
Response times are clearly defined to avoid bottlenecks. For urgent issues, a response is expected within 2–4 hours. For regular updates, the window is one business day, while non-critical questions allow up to 48 hours [19][20]. These guidelines ensure that unanswered messages don’t derail productivity.
The playbook also spells out ownership of responsibilities. For example:
- The Technical Lead oversees code quality.
- The Agency Lead Dev is responsible for delivery.
- The Delivery Owner manages budgets and escalations [18].
When decisions need to be made, there’s no confusion about who has the final say. For technical decisions, the team uses Architecture Decision Records (ADRs) – short, focused documents that capture the context, choices made, and reasoning behind them. These ADRs ensure continuity, even when team members change roles or leave [6][1].
"Flexibility is key to a successful remote work policy." – Alex Mikaelian, Guest Post by CalendarHero [19]
This structured approach ensures smooth onboarding and keeps communication and decision-making efficient from day one.
Onboarding Schedule and Meeting Rhythm
The onboarding process is deliberately structured to set the team up for success. Here’s how the first week typically unfolds:
- Days 1 and 2: Focus on building human connections and understanding the business context. A 90-minute kickoff call with stakeholders covers the project’s vision, roadmap, and working norms [7].
- Days 3 and 4: Dive into the technical side with architecture walkthroughs (recorded for future use), local environment setup, and the team’s first pull request, which validates the commit-review-merge-deploy workflow [7].
- Day 5: Wrap up with a retrospective that includes an Onboarding Friction Log to document any areas of confusion [7].
After week one, the team settles into a steady rhythm:
- Daily 15-minute standups to address blockers.
- Weekly 1-hour technical syncs for architecture discussions.
- Weekly 30-minute delivery syncs to review velocity and timelines.
- 2-hour sprint planning sessions to estimate and finalize scope [18].
To support real-time collaboration, teams maintain a 4-hour daily overlap window – referred to as "golden hours" – ensuring there’s always time to unblock issues [18][6][19]. This structured approach can reduce the time it takes for a team to hit full productivity from 9–12 months to just 6–8 weeks [7].
"The difference between a squad that hits velocity at week four versus week twelve comes down entirely to process discipline in the first 30 days." – Jack Ng, Director, Branch8 [7]
The meeting cadence is paired with robust code review practices to maintain quality from the start.
Code Review and Quality Standards Pack
Maintaining consistent code quality isn’t left to chance. The Code Review and Quality Standards Pack is shared on day one and includes:
- Pull Request (PR) templates.
- Coding conventions.
- Automated quality checks built into the CI/CD pipeline.
For example, merges are automatically blocked if unit test coverage drops below 80% or if static analysis flags a high-severity error [18].
PR feedback follows a tagging system:
[nit]for minor style suggestions.[suggestion]for non-blocking feedback.[required]for mandatory changes [1].
Every PR gets a response within 24 hours [18][1]. Teams that follow structured code review practices like this tend to deploy 30% more often and experience 50% fewer change failure rates [7]. That’s a game-changer when speed and reliability matter.
There’s also a 15-minute rule: if a developer is stuck for more than 15 minutes, they post a structured message in Slack explaining what they’ve tried and their hypothesis. This prevents anyone from wasting time spinning their wheels [1].
First Week Execution Plan and Early Outcomes
The first week is all about turning plans into action. Building on previously established communication protocols and quality benchmarks, the focus shifts to creating tangible deliverables that set the tone for the project. By addressing risk mapping, UX context, and communication structures early, the team ensures a smooth transition into execution mode, producing key outputs that guide the team from day one.
One-Page Engagement Blueprint
This document serves as the foundation for the team’s collaboration. It outlines team roles, responsibilities, and the product’s purpose, combining a Squad Composition Canvas with a concise business context summary. The goal? To define what success looks like six months down the road [7].
The blueprint also clarifies the scope of frontend ownership – detailing which components the team will manage, the API interfaces they’ll work with, and the expected deliverables by the project’s end. By focusing on the "why" behind the work, not just the "what", this document helps the team avoid overextending or narrowing their focus too much.
First Sprint Backlog Snapshot
The first sprint operates at 60–70% capacity [3], giving the team time to acclimate to the environment, troubleshoot any setup issues, and validate pipelines – without jeopardizing the MVP timeline.
The backlog includes small, well-defined "starter tickets" designed to help developers explore different areas of the codebase. These tasks might involve adding unit tests, fixing minor bugs, or refining components to align with the design system. The primary goal? A merged pull request (PR) by the end of the week, with a Time to First Meaningful PR (TFMPR) under 5 business days [7].
"The first task should be completable in 1 to 2 days. The goal is a merged PR in Week 1 that gives both sides confidence." – Acquaint Softtech [5]
A strong completion rate for the first sprint falls between 60–80%, signaling a stable foundation for the project [3]. Early slowdowns often stem from context debt and tooling challenges, rather than developer skills [1].
With initial PRs merged and foundational context established, the next focus is building a sustainable knowledge base.
Documentation Starter Kit and Handoff Patterns
The Documentation Starter Kit is introduced in the first week and includes three key components: Architecture Decision Records (ADRs) in a Context → Decision → Consequences format, a service map that outlines system dependencies, and a domain glossary to bridge any language gaps between the team and the client [1][21].
These documents are designed to evolve with the team’s progress. New developers are encouraged to update them as they identify gaps, creating a shared knowledge base that minimizes reliance on any single team member. This ensures that handoffs – whether due to departures or new arrivals – are structured and seamless.
"The psychological value of getting code merged in the first week is significant… it proves the setup works, the process makes sense, and progress is possible." – Simon Lee, weareaffective.com [22]
Conclusion: Week 1 Deliverables Recap
Week 1 is all about setting the stage for success. Each deliverable – whether it’s risk mapping or establishing communication frameworks – plays a crucial role in driving the project forward. These early steps lay the groundwork for quicker execution and help minimize risks, ensuring a smoother integration process.
Here’s an eye-opener: teams without structured onboarding often take 9–12 months to reach full productivity. But with a solid plan in place, they typically hit that milestone in just 6–8 weeks [7]. Plus, this approach slashes early turnover rates by 82% [2], saving you from the high costs of replacing team members.
Key Takeaways for Founders
For non-technical founders onboarding an outsourced frontend team, Week 1 deliverables are far from just administrative tasks – they’re your safety net. They tackle common challenges like undocumented systems, communication breakdowns, and unclear responsibilities. This ensures your product vision stays intact while your new team gets up to speed.
Some highlights to keep in mind: pre-provisioned access is a game-changer – 41% of onboarding delays are tied to access and environment issues [7]. By Day 5, having a merged pull request signals that the pipeline is functional and the team is ready to roll. And don’t sweat a first sprint running at 60–70% capacity – it’s designed that way and sets the stage for full momentum by Sprint 3.
The Week 1 goal is straightforward: ensure a smooth transition into Week 2.
FAQs
What do you need from me before Day 1 to avoid access delays?
To avoid any access delays, it’s crucial to complete and verify all technical setups ahead of time. Here’s what to check:
- Test VPN and network access to ensure connectivity.
- Grant repository access for platforms like GitHub, GitLab, or Bitbucket.
- Share credentials for staging environments, cloud infrastructure, and deployment pipelines.
- Provide access to communication tools such as Slack or Teams.
- Distribute setup materials, including architecture diagrams, setup guides, and environment variable templates.
Make sure everything is confirmed at least 2–3 days before Day 1 to ensure a smooth start.
How do you decide what’s Red, Yellow, or Green in the roadmap?
We classify tasks and code issues into three categories based on urgency and impact:
- Red: These are critical issues that demand immediate action. They often pose significant risks or could cause major disruptions if not addressed right away.
- Yellow: These represent manageable technical debt. While they don’t require immediate intervention, they should be monitored and resolved in a reasonable timeframe to prevent them from escalating.
- Green: These are stable, low-priority areas. They can be safely deferred without immediate consequences.
This system makes it easier to prioritize by evaluating the severity, potential risks, and how each issue contributes to the overall technical debt.
What should the team’s first Week 1 pull request include?
The team’s initial Week 1 pull request should focus on a simple, clearly defined task. This could be something like fixing a typo, updating a comment, or resolving a small bug. The goal is to confirm that the development pipeline is functioning properly, including the environment setup, code review, and merge processes. It also helps ensure the developer can efficiently navigate the codebase, run tests, and handle reviews. Ideally, this task should take no more than 1-3 days to complete.


Leave a Reply