
End-to-End AI Coding Workflow: A Production-Grade Pattern for Prompts, Error Handling, and Verification
Taher Pardawala June 19, 2026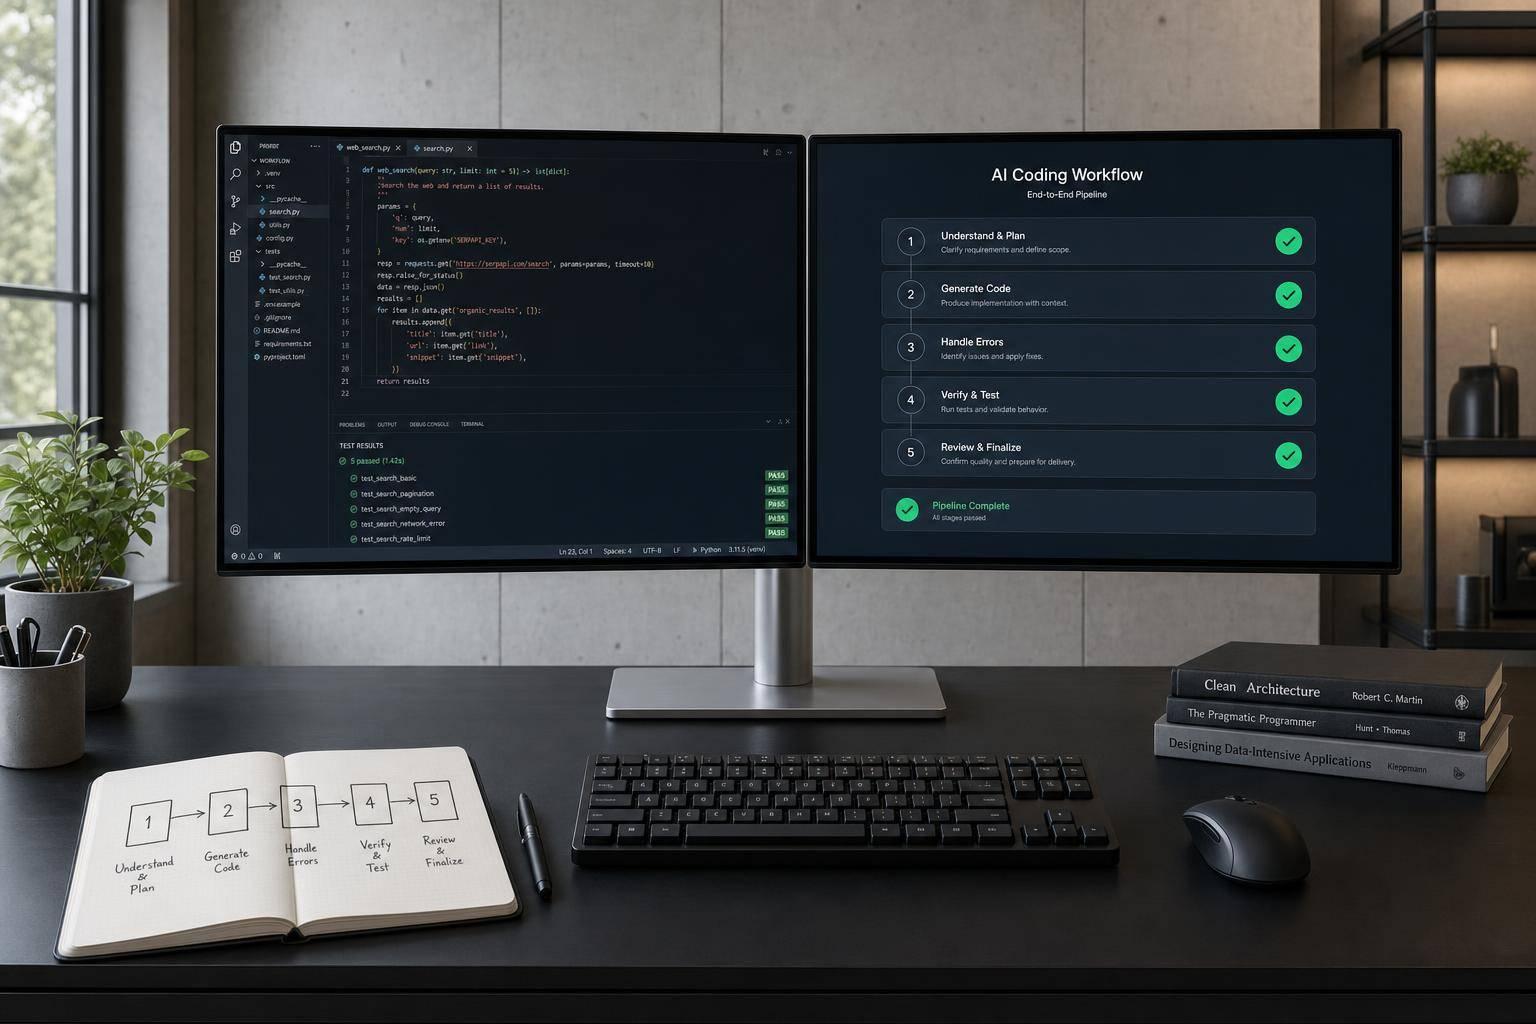
Most AI coding mistakes don’t come from the model alone. They come from a loose process. This article’s main point is simple: if I want AI-written code to survive review, pass CI, and ship safely, I need a fixed loop: prompt clearly, validate every change, repair from exact errors, verify against tests, and stop risky loops early.
Here’s the short version:
- I start with clear prompts that define the goal, file scope, limits, and pass/fail checks.
- I ask for a plan before code so I can catch bad assumptions early.
- I run checks in order: syntax, lint, types, unit tests, then integration or E2E.
- I feed the model the first failing error, with file paths and line numbers, instead of vague feedback.
- I cap repair retries at 3 to 5 attempts to avoid loops that keep making things worse.
- I treat tests as the contract, because research cited here says AI code can have 1.7x more bugs than human-written code.
- I keep human review, CI blocks, staging, rollout controls, and rollback plans in place.
- I use a lighter version for MVP work and a stricter one for legacy, brittle, revenue, auth, or PII-related code.
A few facts stand out. One study cited in the article says developers using AI tools were 19% slower, even though they thought they were 20% faster. Another says better code health can improve the odds of a clean refactor by 20% to 40%. That gap matters. It means speed without checks can fool me.
The takeaway: AI coding works better when I treat it like a controlled engineering loop, not a chat session. The rest of the article explains how to set that loop up and where to tighten rules as risk goes up.
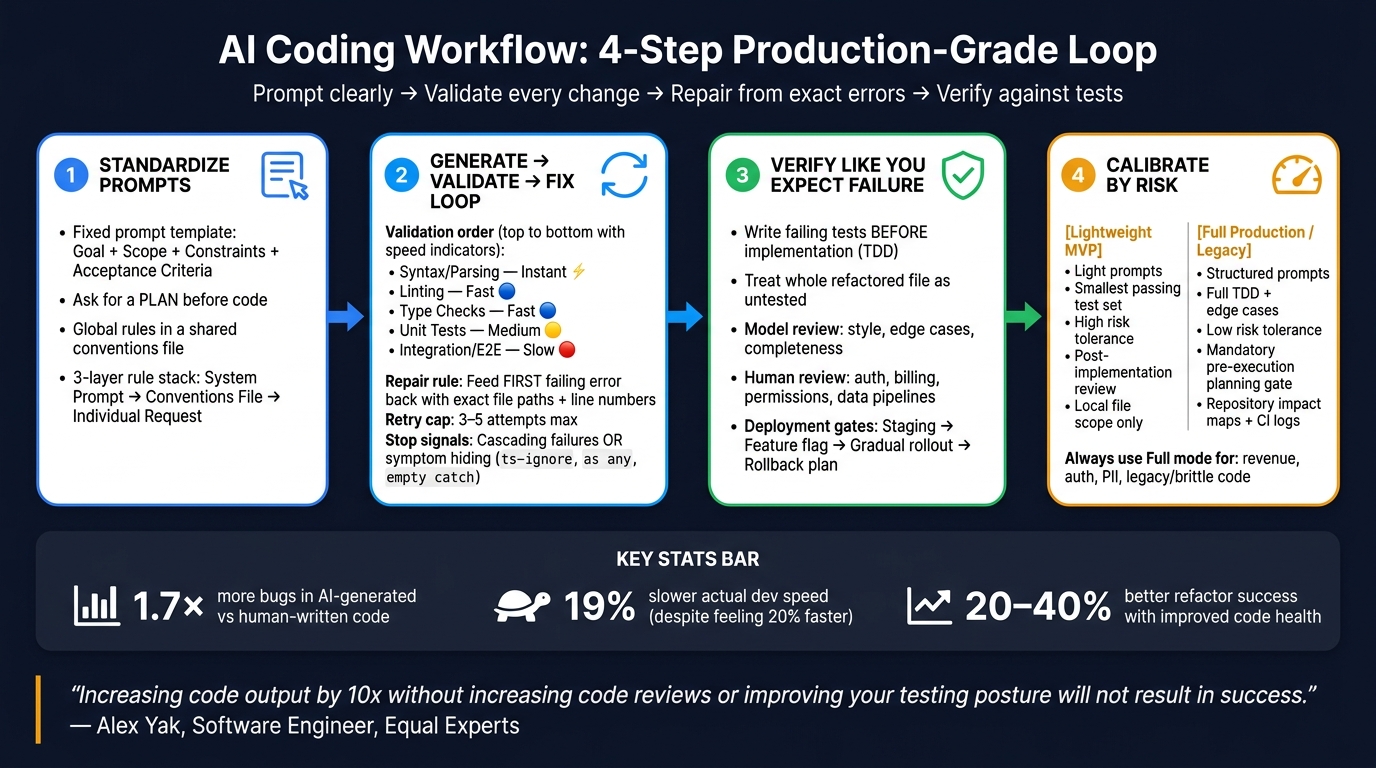
AI Coding Workflow: 4-Step Production-Grade Loop
Step 1: Standardize Prompts Before You Generate Code
Once the agent has safe repo access, standardize how you ask for changes. This makes the generate step repeatable and makes later validation much easier to automate. If your prompts change from task to task, the agent starts filling in gaps on its own. That’s where drift creeps in. Treat each prompt like a spec, not a casual message.
Use a Fixed Prompt Template for Features, Bugs, and Refactors
Include the goal, scope, constraints, and acceptance criteria in every task prompt. When scope is clear and acceptance criteria are testable, error handling gets simpler too. You can sort failures faster because it’s easier to tell what went wrong.
Use this template as a starting point:
<goal>Single-sentence description of what this task must accomplish.</goal> <scope>Files to modify: [list]. Files to leave alone: [list].</scope> <constraints>No new dependencies. [Add latency targets or other limits.]</constraints> <acceptance_criteria>All tests pass: [command]. [Add any other testable checks.]</acceptance_criteria> XML-like tags help separate task intent from constraints and acceptance criteria. In multi-part prompts, that cuts down on ambiguity. [8]
Be explicit about output format and off-limits files so the task doesn’t sprawl. Ask for the smallest file changes needed. Spell out what the model must not touch. For bug fixes, include logs and require a regression test. For refactors, require API stability and no behavior change. [2][6]
Set Global Rules in a System Prompt or Conventions File
Use one shared rule set so every prompt starts from the same baseline. Instead of repeating repo-wide rules in every request, reference a conventions file. [7][8]
That file should hold the decisions that need to stay consistent across tasks: test framework, CSS approach, export style, logging format, and error-handling policy. And instead of describing a pattern in broad terms, point to a real file or folder like src/repositories/. That gives the model something concrete to follow. [5]
| Component | Where It Lives | What Goes There |
|---|---|---|
| Global rules | System prompt | Persona, safety guardrails, role definition |
| Project rules | Conventions file | Architecture decisions, naming conventions, approved libraries |
| Task instructions | Individual request | Goal, file scope, acceptance criteria |
Ask for a Plan First, Then Code
Before generating code, ask the model for a short implementation plan. It should list:
- The files it will modify and leave alone
- The steps it will take, in order
- The command it will run to verify success
That plan acts as a checkpoint before any code gets written. [7][4]
This two-step pattern helps catch problems early, especially when a task touches more than one file. For bug fixes, the plan should also explain how the model will reproduce the failure and which files it believes are involved before it edits anything. That extra step matters. It pushes the model to show that it understands the root cause instead of taking a wild swing at the fix.
That plan becomes the input for the generate-validate-fix loop in the next step.
sbb-itb-51b9a02
Step 2: Build the Generate-Validate-Fix Loop
Use the plan from Step 1 as your starting point. Then run each draft through a validate-and-fix loop until it passes.
The big idea is simple: don’t wait until the end to check the work. Validate after each AI edit, catch problems early, and feed the first failure back into the next prompt.
Run Fast Checks First, Then Deeper Verification
Validation order matters just as much as the checks themselves. Start with the fastest, most deterministic checks, then move into slower verification. That helps you catch syntax and structure issues before they snowball into later test failures.
| Stage | Purpose | Speed | Common Failures Caught | Where to Run |
|---|---|---|---|---|
| Syntax/Parsing | Ensure code is runnable | Instant | Typos, missing brackets, syntax errors | Local |
| Linting | Enforce style & best practices | Fast | Unused variables, style violations, banned APIs | Local & CI |
| Type Checks | Verify data integrity | Fast | Hallucinated APIs, null pointers, type mismatches | Local & CI |
| Unit Tests | Validate specific logic | Medium | Logic errors, edge case failures, regressions | Local & CI |
| Integration/E2E | Verify system-wide flows | Slow | API mismatches, database errors, side effects | CI |
Fix type errors first. After a refactor, they often trigger downstream test failures. [11][12]
Run these checks after every AI edit. Hooks like PostToolUse can kick off linting and type-checking right after each change, so errors don’t pile up across turns. [10]
Then take the first failing check and use it as the input for the repair prompt.
Feed Structured Errors Back Into a Repair Prompt
When a check fails, the way you send feedback back to the model makes a huge difference. “Fix the bugs” is too loose. It gives the model space to wander and invent new failure paths.
What works better? Tight, structured feedback: exact error output, file paths, line numbers, and the code snippet tied to the failure. That keeps the repair focused on the broken part instead of the whole codebase. [10]
Use the same repair prompt format every time:
<original_goal>The task this change was meant to accomplish.</original_goal> <error_log>Exact output from the failing check, including file paths and line numbers.</error_log> <files_inspected>List of files reviewed during diagnosis.</files_inspected> <constraints>What must not change: [interfaces, test files, public API surface].</constraints> <directive>Diagnose the root cause first. Explain your plan. Then apply the fix.</directive> <constraints> is doing a lot of work here. It locks down interfaces, test files, and public APIs so the repair stays aimed at the broken implementation instead of drifting into unrelated edits. [11]
If the loop keeps failing, don’t let it run forever. Stop after a small number of attempts and escalate with a full handoff.
Set Retry Limits and Human Escalation Paths
Autonomous repair loops need a hard stop. Cap the model at 3–5 repair attempts per failure. [10][13]
There’s a practical reason for that: repeated failures clutter the context window with bad paths. After a while, the model isn’t getting closer. It’s just dragging more broken context into the next turn. [14]
Two signals mean you should stop right away, even if you haven’t hit the retry limit yet:
- Cascading failures: fixing one issue keeps creating new ones. That usually points to a deeper structural problem.
- Symptom hiding: the model starts using
@ts-ignore,as any, or empty catch blocks. That’s not a fix. It’s just papering over the error. Reject those changes and require a root-cause fix. [14]
When you escalate, don’t hand over a mess. Pass along the original goal, the prompt history, a diff of the failed changes, the full errors.log, and a clear next step. That gives the developer enough context to jump in without retracing the whole loop. [6]
Step 3: Verify Code Like a Team That Expects Failure
A green repair loop tells you the code stopped failing the obvious checks. That’s it. It does not prove the change meets the business requirement.
This step is about proof. You need tests, model review, and release gates that check the change against the actual requirement.
Treat Tests as the Contract for AI-Generated Changes
Start with the assumption that the first answer is incomplete. Research shows AI-generated code can have 1.7× more bugs than human-written code [15]. And a green CI pipeline is not the same thing as correct code.
Treat tests like the contract. If the code can’t satisfy a failing test, it’s not ready.
A test-first workflow helps here. Have the model write failing tests from the requirements before it writes the implementation. That keeps the flow clear:
- requirements
- failing tests
- implementation
- verified behavior
That order matters. It avoids the trap where the model writes code and tests that simply agree with each other.
If an AI rewrites or refactors a file, treat the whole file as untested, not just the lines that changed [15]. For high-stakes behavior, lean on outcome-based tests instead of checks that only inspect structure [15].
Use Model Evaluation for Style, Completeness, and Obvious Edge Cases – Not Final Approval
Once the code passes its tests, run a separate review pass. This is where you look for style issues, missing cases, and rough edges.
| What to Evaluate | Model Review | Human Review |
|---|---|---|
| Style & conventions | Checks naming, linting, readability | Skims for general feel |
| Edge case discovery | Rapidly surfaces nulls, empty arrays, boundary conditions | Limited by reviewer focus |
| Security trade-offs | May miss context-dependent vulnerabilities | Understands the specific threat model |
| Business logic | Checks against the provided spec | Verifies if the outcome matches business intent |
| Domain risk | Lacks real-world consequence awareness | Evaluates user impact and compliance exposure |
"AI code is over-confident on the happy path and under-attentive to edge cases, security context, and version-specific APIs." – Harsh Shuddhalwar, Fullstack Developer, Cadence [12]
Use the evaluator pass for mechanical checks. Use human review for anything tied to auth, billing, permissions, or core data pipelines. Those are the spots where code can look fine, pass basic checks, and still be dead wrong.
Keep Human Review and Deployment Guardrails in Place
Keep CI blocking. Require human approval before merge.
A human reviewer still has to confirm that the change matches the intent, especially for high-stakes edits.
Keep PRs small and focused too. Small PRs are easier to review, easier to bisect when something regresses, and less likely to bury unrelated cleanup inside the diff.
And verification doesn’t stop at CI. It carries into staging, rollout, and rollback readiness. If an AI change is headed to production, take the cautious path: stage it first, then ship behind a feature flag or a gradual rollout, with a rollback plan confirmed before deployment.
One more rule is worth making standard: add a regression test for every production bug.
Step 4 shows how to keep these same controls while cutting overhead for MVPs and tightening them for fragile codebases.
Step 4: Adjust the Workflow for MVPs, Legacy Systems, and Team Maturity
Tune the same workflow based on risk. Tighten it for brittle changes. Strip it down for reversible MVP work. These MVP and legacy modes are two settings on the same generate-validate-fix loop, not two different systems. If a team is still getting comfortable with this way of working, keep prompts narrower and review more strict on shared or risky code.
Use a Lighter Version for Fast MVP Delivery
Early-stage projects need less ceremony, not less structure.
As a codebase gets bigger, ad hoc prompting starts to fall apart. A small amount of structure helps you stay ahead of that without slowing down delivery.
Use the lightweight prompt version from Step 1. Planning still matters, even here. A bad assumption caught before code is written is far cheaper than one found later in a PR review.
Use the smallest test set that proves the change. Human review can be lighter for reversible, low-risk work. But if the change touches money, auth, or PII, keep the stricter full TDD path in place [9].
Harden Fragile or Legacy Codebases Incrementally
When speed matters less than blast radius, switch from lightweight prompts to trace-first planning.
Legacy systems need the stricter path. Before the AI writes code, run symbol analysis with tools like ctags, grep, or ts-morph to build a repository impact map. That gives the agent a view of the actual call surface instead of guessed file paths.
Then tighten things step by step. Add validation and tests around brittle areas first. After that, expand the AI’s allowed scope. Ask for unified diffs or targeted function updates, not full-file rewrites. Be explicit about which files it may change and which files it must not touch.
Use the two modes below as a quick decision rule, not as a separate workflow.
| Lightweight MVP | Full Production / Legacy | |
|---|---|---|
| Prompting | Light prompt [4][17] | Structured prompt [17] |
| Test Depth | Smallest set that proves the change [16] | Full TDD loop with edge-case coverage [9] |
| Risk Tolerance | High; reversible changes [3] | Low; revenue-critical/PII focus [9] |
| Approval Gate | Post-implementation review [3] | Mandatory pre-execution planning gate [1] |
| Source Scope | Local file only [4] | Repository impact maps and CI logs [1] |
Conclusion: Keep the Pattern, Tighten the Guardrails as You Grow
The four steps in this guide – standardize prompts, run the generate-validate-fix loop, verify against tests and human review, then calibrate by risk – work as one reusable operating pattern. The model is only one part of that setup.
"Increasing code output by 10x without increasing code reviews or improving your testing posture will not result in success." – Alex Yak, Software Engineer, Equal Experts [3]
What makes this pattern hold up over time is simple: it grows with your codebase and your team. Start lean. Add more checks where failure is costly. In practice, the guardrails around the model matter more than the model itself.
FAQs
How do I choose between the MVP and full production workflow?
Choose the MVP workflow for one-off tasks, when errors are hard to catch with code, or when setting up verification would take more effort than the task itself.
Use the full production workflow for repeated work, known error patterns, or high-risk bugs. It leans on test suites, automated verification, human review before merges, monitoring, and version-controlled prompts to keep things stable over time.
What should I do if the AI keeps failing after several repair attempts?
If the AI falls into a repair loop and starts fixing one thing while breaking another, stop right there. Don’t let it keep editing. Ask it to review the current state without making any more changes.
If the thread gets cluttered with failed attempts, wipe the slate clean and start a new session. Then point the AI toward a new plan – or the root cause – instead of letting it keep patching things through trial and error.
Which checks should I automate first in an AI coding workflow?
Automate these first because they catch common, objective errors fast:
- compiler and type checkers
- linters
- unit tests
These three checks are the core foundation of a production-grade workflow.
After that, add integration tests, end-to-end testing, and automated observability. Use PostToolUse hooks so the agent gets immediate feedback and can fix failures on its own.
Related Blog Posts
- 5 AI Prompts Every Developer Should Master (Copy-Paste Ready)
- The AI Developer Productivity Trap: Why Your Team is Actually Slower Now
- We’ve Rescued 15+ Codebases That AI Tools Helped Break. Here’s the Pattern
- AI Prompts for Code Review: How to Get Genuinely Useful Feedback From an LLM on Someone Else’s Code


Leave a Reply