
The First-Week Legacy Audit: Exactly What We Map Before Writing a Single Line of Modernisation Code
Taher Pardawala June 10, 2026
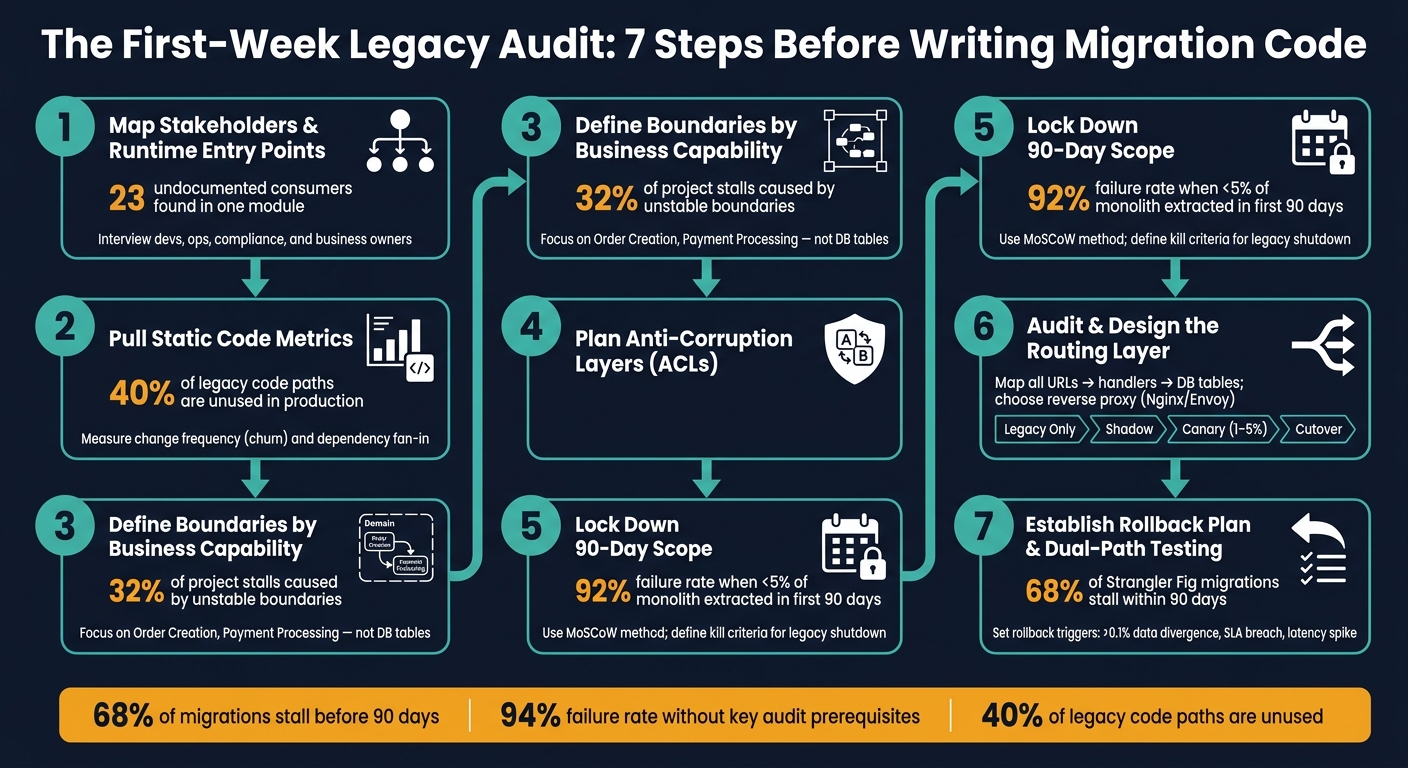
The First-Week Legacy Audit is a process that helps teams avoid common pitfalls in system modernization projects, particularly those using the Strangler Fig pattern. Many projects fail because teams skip critical early steps, like understanding dependencies, defining clear boundaries, and planning for routing and testing. Here’s what you need to know:
- Why It Matters: 68% of Strangler Fig migrations stall within 90 days, often due to hidden dependencies and scope creep.
- Key Focus Areas:
- Map stakeholders and runtime entry points to uncover undocumented dependencies.
- Use static code metrics (e.g., change frequency, dependency fan-in) to prioritize migration targets.
- Define boundaries based on business capabilities, not technical layers.
- Plan Anti-Corruption Layers (ACLs) to translate legacy semantics into modern models.
- Lock down scope for the first 90 days to prevent unnecessary complexity.
- Audit and design a routing layer to separate legacy from modern traffic.
- Establish a rollback plan and dual-path testing to ensure smooth transitions.
This audit ensures you start with a clear understanding of your system, reducing risks and increasing the chances of success before writing migration code.
Legacy System Audit: 7-Step Pre-Migration Framework
Mapping the Legacy System: People, Runtime, and Code
This section dives into how to capture the current state of a legacy system – focusing on its people, runtime, and code – before diving into migration efforts. It builds on the earlier audit process of stakeholder mapping and system dependencies.
Start with Stakeholders, Not Code
Before writing any migration code, take time to map out the production system as it operates today. Begin by interviewing key stakeholders, such as developers, operations teams, compliance experts, and business owners. These conversations will help uncover vulnerable components, workflow bottlenecks, and manual workarounds that highlight weak points in the system.
One common surprise for teams? Undocumented consumers. For example, a logistics company found 23 previously unknown downstream consumers of a single module, including three internal departments. That same module was responsible for 60% of their support tickets. By mapping stakeholders to business capabilities – like Order Creation, Payment Processing, or Shipment Tracking – rather than just technical modules, the team was able to align their technical roadmap with the business’s most pressing needs [9].
To prioritize effectively, use a Risk × Impact matrix. Plot system modules based on their technical risk (e.g., complexity or migration difficulty) and their business impact (e.g., revenue contribution or regulatory importance). Modules that are high-impact but low-risk should be tackled first [2].
Once you’ve gathered input from stakeholders, the next step is to map every runtime entry point to ensure you’ve captured the full picture.
Catalog Every Runtime Entry Point
When it comes to understanding the system’s runtime behavior, trust production telemetry over outdated documentation. Use tools like access logs, network traffic analysis, and telemetry to verify what’s actually happening.
Pay close attention to entry points such as:
- HTTP routes
- Background jobs
- Cron tasks (especially those with cryptic names like
nightly_sync_v2) - Message queue consumers
- External systems that access your production database directly
BI tools and analytics pipelines are notorious for bypassing the application layer entirely, making them invisible to code-level analysis. To address this, consider placing a routing facade – like an API gateway or reverse proxy – early in the process. This will give you a centralized way to monitor all traffic before making any changes [1][8].
Pull Static Metrics from the Codebase
After mapping runtime interactions, dive into the codebase to identify high-risk and high-impact components through static analysis. Two key metrics to focus on are change frequency (churn) and dependency fan-in.
- Change frequency highlights files where developers spend the most time and experience the most frustration. These are prime candidates for early migration.
- Dependency fan-in shows which modules are heavily relied upon by others. These modules require extra care, as changes here can cause widespread issues.
Interestingly, 40% of legacy code paths are often unused in production [8], which reduces the overall migration workload. Use version control history to measure commit frequency per file over the past year – this can serve as a good indicator of fragility and areas that slow down delivery.
Here’s a quick breakdown of useful static metrics:
| Static Metric | What It Reveals | Impact on Migration |
|---|---|---|
| Change Frequency | Low velocity, high developer pain | Highlights high-ROI candidates for migration |
| Dependency Fan-in | Architectural coupling | Helps define safe boundaries for routing facades |
| Unused Code Percentage | Unused functionality | Reduces the migration surface area |
| Data Dependency Graph | Database cross-domain coupling | Guides service extraction sequencing |
"Running systems contain knowledge that isn’t written anywhere else." – notna.tech [8]
Finally, apply the same attention to database dependencies. Shared tables, cross-domain foreign keys, and implicit joins often pose greater challenges than the application code itself. If overlooked, these issues can cause major headaches later in the migration process [7].
Defining Boundaries: Keeping the Strangler Surface Under Control
Once you’ve identified your stakeholders, runtime entry points, and static code metrics, the next step is defining clear boundaries. Many migrations stumble, not because of poor code, but due to boundaries that don’t align with real business needs.
Use Domain Knowledge to Find Candidate Boundaries
A common mistake is to draw boundaries around technical layers like database tables, UI components, or packages. Instead, boundaries should center on business capabilities – things like "Order Creation" or "Payment Processing." These are easier to manage because they typically have clear ownership, defined inputs and outputs, and measurable results. A database table, on the other hand, lacks this clarity.
"The Strangler Fig pattern is not about microservices… It is about this mindset shift: Stop thinking in terms of ‘applications.’ Start thinking in terms of capabilities, ownership, and contracts." – Sahana, AWS in Plain English [10]
Unstable boundaries are a major issue, causing 32% of modernization project stalls [5]. To avoid this, focus on observable behaviors like APIs, workflows, and data contracts – elements that teams already recognize as independent units. From there, prioritize candidates that offer high business value and low database coupling. For instance, an insurance SaaS team successfully migrated a 380,000-line VB6 pricing engine to .NET 8 (February 2024 to April 2025) by starting with a single, well-defined pricing capability. This capability had clear inputs, outputs, and minimal foreign key dependencies across domains [5].
Once boundaries are set, the next step is isolating the legacy system’s semantics using Anti-Corruption Layers.
Plan Where Anti-Corruption Layers Go
Legacy systems often mix multiple meanings into a single field or structure. For example, a status field might represent billing, support, and fulfillment states simultaneously. If this ambiguity leaks into your new system, it just shifts the problem rather than solving it.
An Anti-Corruption Layer (ACL) acts as a translator between your new service and the legacy system. It ensures that overloaded legacy fields, mismatched enums, and ambiguous identifiers are converted into a clean, modern domain model before reaching the new code [4]. To keep things manageable, make these translation rules explicit and versioned. For example, a deterministic rule table that maps legacy PENDING to specific modern states is much easier to test and maintain than scattered conditional logic.
"ACLs prevent legacy semantics from polluting new domain boundaries." – Abstract Algorithms [4]
When deciding where to place an ACL, consider the structure of your legacy system. If your database contains outdated, denormalized tables shared across domains, an effective approach is to position the ACL at the data access layer using database views. This strategy allows you to decouple the new service from the old schema without requiring an immediate data migration [3].
With boundaries and ACLs in place, the next challenge is controlling the scope to avoid unnecessary complexity.
Lock Down Scope for the First 90 Days
Scope creep is a major risk during migrations. Adding extra features or fields can quickly turn a focused effort into an unmanageable rewrite. Projects that extracted less than 5% of monolith functionality in the first 90 days had a 92% failure rate [5]. The issue wasn’t speed – it was undefined scope pulling teams in too many directions.
During the first week of your migration, clearly list which domains to exclude for the next 90 days. The MoSCoW method is a helpful tool for negotiating "Won’t" items with stakeholders [2]. Remember, a slice of functionality isn’t complete when it’s built – it’s complete when the corresponding legacy component is shut down [6]. Define specific "kill criteria" (e.g., four weeks of zero data mismatches) that trigger the decommissioning of legacy components. Without this, the legacy system can linger indefinitely, undermining the whole migration effort.
Auditing the Routing Layer: Separating Legacy from Modern
Once you’ve established boundaries and planned ACLs, it’s time to tackle the routing layer. The goal here is to separate legacy routes from modern ones, which can get tricky. Often, the issue isn’t bad code but a routing setup that wasn’t built with a split system in mind.
Document the Current Routing Map
Before making any changes, take stock of your current routing setup. Use tools like grep to scan through Nginx configurations, .htaccess files, or router definitions. Map out every URL pattern in your system, linking each route to its handler and the database tables it interacts with [12][17]. This process often uncovers unused paths, which can reduce the complexity of your migration.
Create a central migration.md file at the root of your repository to track key details for each route. This file should include the handler, associated database tables, migration status, and any known quirks. It will serve as your go-to reference and help avoid duplicate work.
| Migration Step | Documentation Goal | Risk Identified |
|---|---|---|
| Inventory | Map URLs to files/handlers | Undocumented entry points |
| Data Mapping | Link routes to DB tables | Hidden data coupling |
| Instrumentation | Track request frequency | Dead code/unused features |
| Shadowing | Compare old vs. new output | Behavioral divergence |
With a clear map in hand, you can move forward with selecting a routing architecture that avoids unnecessary coupling.
Choose a Routing Architecture for the Migration
The routing layer is the backbone of your migration. Choosing the wrong setup here can lead to the tight coupling you’re trying to avoid.
"The routing layer is the architectural spine: reverse proxy, API gateway, BFF, or feature-flag middleware – pick the boring, reversible option." – Palakorn Voramongkol, Software Engineer [13]
A reverse proxy, such as Nginx or Envoy, is often the simplest and most effective choice. It keeps routing rules straightforward and separate from business logic. On the other hand, API gateways can embed logic into the routing layer, potentially creating "edge monoliths" [13]. Feature-flag middleware offers flexibility for user-segment routing but can introduce latency due to flag lookups. The key is to choose an option that is simple, reversible, and allows for easy rollbacks.
Keep the routing layer lean. Its job is to direct requests – not to handle data transformations, enforce business rules, or manage state.
Once your routing framework is finalized, you’re ready to plan the traffic migration.
Design a Phased Traffic Migration Plan
A phased migration reduces the risks associated with a full cutover. Here’s how you can approach it in four steps [16]:
- Legacy Only: All traffic is routed to the old system. This serves as your baseline.
- Shadow Mode: Traffic continues to flow through the legacy system, but a copy is sent to the new system for comparison. This helps identify mismatches without user impact.
- Canary Mode: Gradually route 1–5% of live traffic to the new system. Use deterministic hashing on user IDs to ensure consistency for each user [15].
- Cutover: Move 100% of traffic to the new system, keeping the legacy path dormant as a rollback option.
For example, a Series B e-commerce company turned around a failed $2M Node.js rewrite by adopting this phased approach with an Nginx reverse proxy. They started with the Product Catalog API and used Change Data Capture to sync databases. The migration took eight months, cost about $400,000, and avoided downtime entirely [14].
Add an X-Served-By header to every response so your team can quickly identify which system handled the request during debugging [13]. Once an endpoint reaches full cutover, include a // DELETE BY [DATE] comment in the legacy code. This ensures cleanup tickets are created to remove outdated paths [13].
sbb-itb-51b9a02
Ownership and Testing: Setting Guardrails Before You Build
Assign Ownership Across Legacy and Modern Code
To prevent coordination failures, assign ownership based on business capabilities rather than technical layers. For example, focus on areas like "Order Creation" or "Authentication" instead of specific database tables or modules [10][7].
A key rule to avoid data conflicts is this: at any given time, only one system should have write authority for a specific domain entity [16][7]. Allowing both legacy and modern systems to write to the same data leads to discrepancies that are incredibly difficult to resolve. When a team begins modernizing a capability, they should take full ownership of it, including the associated legacy behaviors, until the legacy system is retired. This clarity ensures you can establish an accurate baseline of how the system behaves today.
Capture a Baseline of Current System Behavior
Legacy documentation often describes how a system was intended to work, not how it actually operates [1][6]. Before developing any modernization code, it’s critical to record the current behavior of the system – quirks, bugs, and all – because users may rely on these idiosyncrasies without realizing it.
Characterization testing is a practical way to document this. These tests capture the system’s existing behavior, providing a concrete reference for your new system to match, even if the behavior includes known bugs [8][18].
"Characterization tests aren’t tests of what the system should do, they’re tests of what it does do." – notna.tech (referencing Michael Feathers) [8]
Start by adding logging and observability to the legacy system before making any changes. Most legacy code paths aren’t active in production [8], so understanding which paths are in use and which are obsolete will guide your decisions about system boundaries. With this baseline documented, you can confidently plan your testing strategy for dual-path systems.
Build a Testing Plan for Dual-Path Systems
When shifting traffic between legacy and modern systems, use a structured testing plan that balances cost and coverage. Layer your validation techniques as follows:
| Validation Technique | Cost | Coverage | Best For |
|---|---|---|---|
| Row-count Checksums | Near-zero | Low | Catching major data loss [2] |
| Field-level Hashes | Low | Medium | Identifying field-level data drift [2] |
| Sampled Record Diffs | Medium | High | Verifying semantic equivalence on slices [2] |
| 100% Record Diffs | High | Total | Financial and regulated workloads [2] |
Start with row-count checksums to detect large-scale data loss. Once the read path stabilizes, move to field-level hashes to spot more granular issues. Use sampled record diffs as you approach write migration, and reserve full record diffs for critical areas like payment systems or regulatory data.
Before shifting live traffic, set clear rollback criteria. Examples include data divergence exceeding 0.1%, error rates surpassing your SLA, or latency increases beyond agreed limits [2][4]. Automating rollback at the API gateway or service mesh level ensures you’re protected, even during off-hours when no one is actively monitoring the system.
Feature Flags and Observability: Using These Tools Without Adding Risk
Adding feature flags and observability to your migration strategy can significantly reduce risk – if done with care. These tools, when used thoughtfully, help ensure a smoother transition without introducing unnecessary vulnerabilities.
Define a Taxonomy for Feature Flags
One common mistake during a Strangler Fig migration is treating all feature flags the same. But not all flags are created equal. For instance, a flag controlling a new payment service carries far more risk than a flag for a minor UI tweak. Each type of flag needs its own rules for ownership, expiration, and defaults.
To manage this effectively, divide your flags into three categories:
- Migration flags: These are temporary and control routing between legacy and modern systems.
- Release flags: These determine whether a feature is visible to users.
- Permission flags: These are tied to user roles or subscription plans [20].
Migration flags are especially risky because they affect live data flows. They should have strict expiration policies, clear ownership, and aggressive deletion timelines. Once a migration flag reaches full rollout, it’s critical to remove it along with the legacy code path. As Marcus Johnson, Staff Engineer at Featureflow, explains:
"The strangler fig only works if the host actually dies. Add a ticket the day you reach 100% rollout: remove the flag, remove the conditional." [20]
Use Flags Safely in Migration Flows
Before shifting live traffic, test the behavior in shadow mode to uncover any undocumented edge cases. This step ensures you’re not caught off guard by unexpected issues.
When it’s time to move live traffic, do so incrementally – start small (e.g., 1%), then gradually increase (5%, 20%, and so on). Use consistent hashing to keep users tied to the same path throughout the process [11]. Additionally, configure your flag service to default back to the legacy path if it becomes unreachable [13].
Document rollback triggers in advance, and make sure they’re clear and actionable. As easy.bi puts it:
"A rollback strategy is not a safety net for the system. It is a safety net for the people." [19]
Wire Observability Into Both Paths
To effectively monitor your migration, tag each request with headers like X-Migration-Phase or X-Served-By. This makes it easier to distinguish between legacy and modern traffic in your logs and dashboards [11]. Without this tagging, tracking down production issues can feel like searching for a needle in a haystack.
Beyond tracking standard metrics like latency and error rates, focus on business correctness. For example, ensure that order totals and search results are consistent between the old and new systems. Technical metrics alone won’t catch subtle errors that could affect your users [13][19].
| Metric | Why It Matters |
|---|---|
| Divergence Rate | Measures correctness by comparing legacy and modern outputs [4] |
| Router/Seam Latency | Identifies if routing layers are causing unacceptable delays [4] |
| Change Failure Rate | Tracks the percentage of flag flips that lead to rollbacks [2] |
| Mean Time to Recover (MTTR) | Measures how quickly you can restore service after an incident [2] |
Before live trials, run rollback drills to ensure your observability triggers work as intended. This preparation can save you valuable time during critical moments.
Conclusion: What the Audit Gives You Before You Write a Line of Code
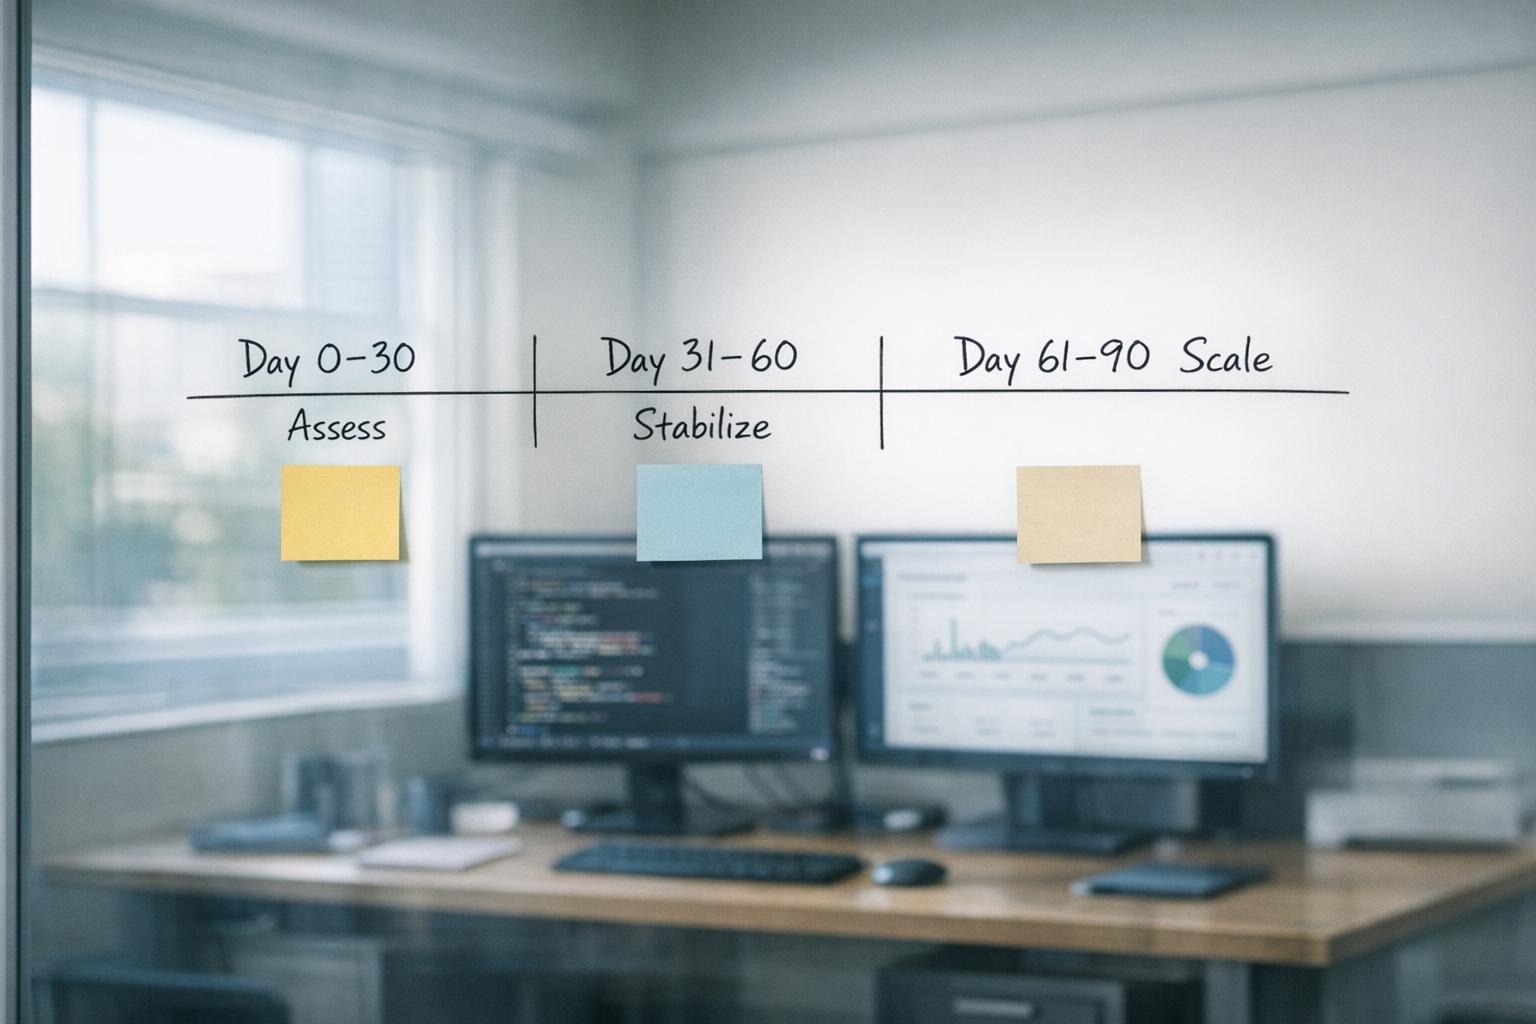
The first week of a project isn’t wasted – it’s the foundation for the next 90 days. Whether those days are smooth sailing or full of setbacks often depends on the groundwork laid early. Research shows that 68% of projects like these stall before hitting the 90-day mark, and a staggering 94% of those that lack two key prerequisites end in failure [5]. This is where the audit steps in, addressing these gaps before modernization even begins.
Every audit deliverable tackles a specific failure risk. For example, the dependency map, built using real production telemetry (not outdated documentation), helps uncover hidden dependencies. One team, for instance, identified numerous undocumented consumers that could have completely derailed their migration [9]. The ACL mapping ensures legacy semantics don’t creep into the new domain model. The routing strategy keeps the facade clean and reversible, while baseline behavior capture provides a clear benchmark for identifying divergences during parallel testing.
"A rewrite is an act of hope. Strangler Fig is an act of control." – Sahana, Cloud Architect [10]
The table below shows how each audit output directly counters common risks in the first 90 days:
| Audit Output | Failure Mode It Prevents |
|---|---|
| Dependency Map | Breaking undocumented downstream consumers [9] |
| ACL Mapping | Legacy logic polluting the new domain model [4] |
| Risk × Impact Matrix | Scope creep beyond the first 90-day window [2][9] |
| Routing & Seam Strategy | Tight coupling between the facade and legacy system [10][7] |
| Parallel Run & Rollback Plan | Rollback costing hours instead of seconds [2] |
| Behavior Baseline | Undetected divergence between legacy and modern paths [8] |
These deliverables directly tackle challenges around routing, boundaries, ownership, and testing, all of which were highlighted earlier.
One key insight from the audit is that 40% of legacy code paths are often unused [8]. By identifying these dead paths during the audit, you can shrink the migration scope before even starting. This efficiency can make the difference between a manageable 90-day migration and a project that spirals out of control.
The audit isn’t just preparation – it’s a way to speed up your migration efforts while reducing risks. It ensures you start off on the right foot.
FAQs
What should I deliver by the end of week 1?
By the close of the first week, you need to present a documented modernization roadmap. This isn’t about finalizing the design but rather creating a clear and well-supported plan. The focus should be on thoroughly cataloging your current system to set the stage for future decisions.
Here’s what to include:
- Static Code Analysis: Perform an in-depth review of your codebase to identify potential issues, inefficiencies, or areas that need attention.
- Dependency Mapping: Identify and chart hidden dependencies within your system. This will help uncover any tightly coupled components that could complicate modernization efforts.
- API and Database Schema Inventory: Document the structure of your APIs and database schemas to understand how data flows and interacts across modules.
With this data in hand, create a risk-and-impact matrix to evaluate how each system component might affect the modernization process. Use this analysis to categorize modules into three groups: migrate, retain, or retire. This structured approach ensures your roadmap is both actionable and defensible.
How do I pick the first capability to strangler-migrate?
When choosing a domain for migration, focus on one that offers high value, clear boundaries, and measurable outcomes. This ensures you can effectively track progress and results while keeping complexity manageable. Steer clear of smaller, less significant components – they often don’t generate enough traffic to provide meaningful validation for your toolchain.
A great starting point is a read-only endpoint, such as a report generator. This approach allows for shadow testing, enabling you to observe how the new system performs without the risk of causing unintended changes or write-side effects.
Keep in mind, if your migration effort stretches beyond 2 to 6 weeks, it’s a sign that the scope is too large. Break it into smaller, more manageable pieces to maintain momentum and avoid unnecessary delays.
What’s the safest way to route and roll back traffic?
When it comes to managing your routing layer – whether it’s an API gateway, reverse proxy, or feature-flag middleware – the key is keeping it focused on infrastructure tasks and separate from business logic. Before diving into new code, set up a clear control point to maintain order.
Techniques like Shadow Mode, Canary Release, and Progressive Rollout are excellent for making smooth transitions. These methods ensure you can quickly revert to your legacy system if something goes wrong. Feature flags are also invaluable, allowing you to toggle features on or off instantly. Finally, make sure your routing rules are declarative and versioned to maintain clarity and control.


Leave a Reply